For businesses relying on used
copiers and
duplicators, paper jams are one of the most frequent and frustrating issues—often disrupting workflow and causing unnecessary downtime. While second-hand equipment offers cost savings, understanding common jam codes, their error meanings, and how to quickly locate and resolve the problem is key to keeping your
machine running smoothly. Below, we break down the most common jam codes, what they indicate, which components are likely affected, and step-by-step troubleshooting to get you back up and running fast.
Note: Jam codes may vary slightly by brand (e.g., Canon, Ricoh, Konica Minolta, Sharp) and model, but the core meanings and troubleshooting steps are consistent across most used copiers and duplicators. Always refer to your machine’s user manual for model-specific details, but use this guide as a universal reference for common issues.
1. Common Jam Codes, Error Meanings & Component Location
Paper jams typically occur at specific stages of the printing/duplicating process: paper feed (from the tray), transfer roller, fuser unit, or output tray. Each stage corresponds to a unique jam code, helping you quickly pinpoint where the issue lies.
1.1 Jam Code: J00 / J01 (Paper Feed Jam – Tray 1)
Error Meaning: The machine cannot feed paper from the main tray (Tray 1) or the paper is stuck as it enters the feed mechanism. This is the most common jam code for used copiers/duplicators, often caused by worn feed rollers, misaligned paper, or low-quality paper.
Component Location: Main paper tray (Tray 1), feed rollers, paper pick-up assembly, and the entry path to the drum unit.
1.2 Jam Code: J02 / J03 (Paper Feed Jam – Tray 2/3)
Error Meaning: Similar to J00/J01, but the jam occurs in an auxiliary tray (Tray 2 or 3). This is common if the auxiliary tray is rarely used (leading to dusty or worn rollers) or if the paper size/type does not match the tray settings.
Component Location: Auxiliary paper tray (Tray 2/3), feed rollers for the auxiliary tray, and the connecting paper path to the main mechanism.
1.3 Jam Code: J10 / J11 (Transfer Roller Jam)
Error Meaning: Paper is stuck at the transfer roller, which is responsible for transferring toner from the drum to the paper. This can happen if the transfer roller is dirty, worn, or misaligned, or if the paper is too thick/thin.
Component Location: Transfer roller (located between the drum unit and fuser unit), often accessible by opening the front or side cover of the machine.
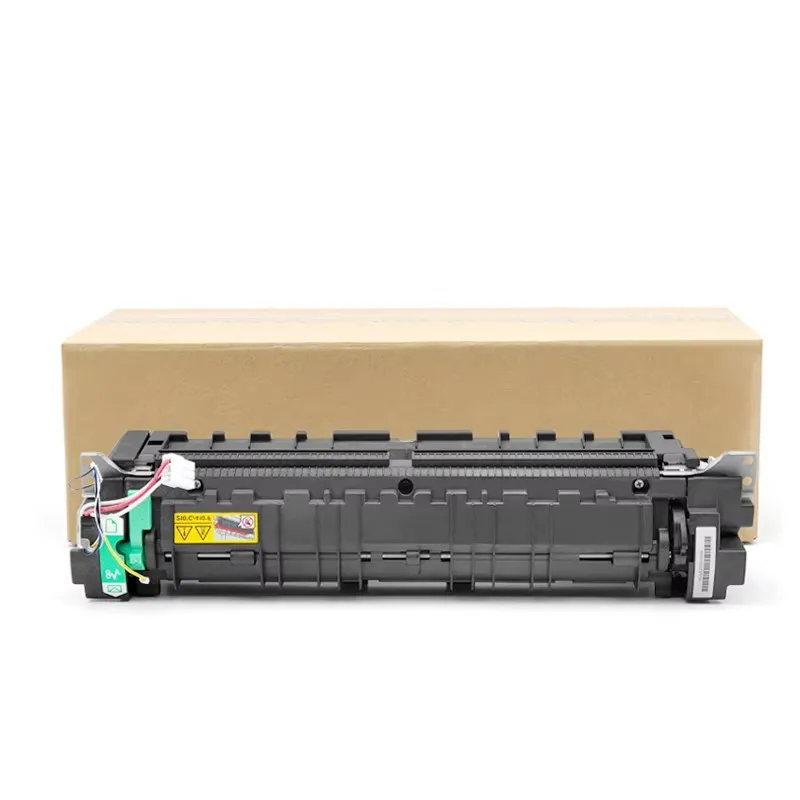
1.4 Jam Code: J20 / J21 (Fuser Unit Jam)
Error Meaning: Paper is stuck in the fuser unit, which uses heat and pressure to fuse toner to the paper. This is a critical area—jams here may indicate a worn fuser roller, broken heat element, or paper that is not fuser-compatible (e.g., low-quality or damp paper).
Component Location: Fuser unit (usually at the rear or top of the machine, marked with a “Caution: High Temperature” label—allow the unit to cool before handling).
1.5 Jam Code: J30 / J31 (Output Tray Jam)
Error Meaning: Paper is stuck as it exits the machine into the output tray. This is often caused by a blocked output path, worn exit rollers, or overloading the output tray.
Component Location: Output tray, exit rollers, and the final paper path leading to the tray.
1.6 Jam Code: J50 / J51 (Internal Paper Path Jam)
Error Meaning: A general jam in the internal paper path (not tied to a specific tray or unit). This may occur if paper is torn during a previous jam, leaving small pieces stuck in the mechanism, or if foreign objects (e.g., staples, paper clips) are present.
Component Location: Internal paper path (check all access points: front cover, side cover, rear cover) and the drum unit area.
2. Step-by-Step Troubleshooting for Paper Jams
Before starting, always turn off the machine and unplug it (especially when handling the fuser unit, which remains hot after use). Follow these steps to resolve jams safely and effectively:
Step 1: Confirm the Jam Location
Check the machine’s display panel for the jam code and follow the on-screen prompts (most used copiers/duplicators will show a diagram indicating where the jam is located). If no diagram is available, use the jam code to reference the component location above.
Step 2: Access the Jammed Paper
For Tray Jams (J00/J01/J02/J03): Open the corresponding paper tray, remove any remaining paper, and gently pull the jammed paper straight out (do not pull at an angle, as this can tear the paper and leave pieces in the mechanism). Check the feed rollers for dust or wear—wipe them with a lint-free cloth if dirty.
For Transfer Roller Jams (J10/J11): Open the front or side cover, remove the drum unit (if necessary), and locate the transfer roller. Gently pull the jammed paper out, being careful not to touch the drum (this can cause toner smudges). Wipe the transfer roller with a clean cloth to remove dust or toner buildup.
For Fuser Unit Jams (J20/J21): Allow the fuser unit to cool for 10–15 minutes (it gets extremely hot). Open the rear or top cover, locate the fuser unit, and gently pull the jammed paper out—if it is stuck, use the fuser release lever (if available) to loosen it. Do not force the paper, as this can damage the fuser roller.
For Output Tray Jams (J30/J31): Clear any paper from the output tray, then gently pull the jammed paper out from the exit path. Check the exit rollers for debris and wipe them clean if needed.
For Internal Path Jams (J50/J51): Open all access covers (front, side, rear), remove the drum unit and
toner cartridge (if necessary), and check for torn paper pieces or foreign objects. Use a flashlight to inspect hard-to-reach areas—use tweezers to remove small debris (do not use sharp tools, as this can damage internal components).
Step 3: Reset the Machine
After removing the jammed paper and any debris, reinsert all components (drum unit, toner cartridge, paper trays) securely. Close all covers, plug the machine back in, and turn it on. The jam code should clear—test the machine with a test print to ensure the issue is resolved.
Step 4: Prevent Future Jams
To reduce the frequency of paper jams in your used copier/duplicator, follow these tips:
Use high-quality, dry paper that matches the machine’s recommended paper type (avoid damp, wrinkled, or low-weight paper).
Align paper in the tray properly and do not overfill the tray (follow the maximum fill line).
Clean feed rollers, transfer rollers, and the fuser unit regularly (every 1–2 months) to remove dust and toner buildup.
Replace worn components (feed rollers, fuser rollers) promptly—used machines may have worn
parts that contribute to jams.
Avoid putting staples, paper clips, or other foreign objects near the paper tray.
3. When to Seek Professional Help
If you encounter any of the following issues, the jam may be caused by a more serious problem with your used copier/duplicator—contact a professional service technician:
The jam code reappears immediately after resetting the machine (indicating a persistent mechanical issue).
Paper tears repeatedly in the same location (likely a worn or damaged component).
The fuser unit is making unusual noises (e.g., squealing, grinding) or not heating properly.
You cannot access the jammed paper (it is stuck in a hard-to-reach internal area).
At SC, we specialize in high-quality used copiers, duplicators, and their consumables. Our team of experienced technicians thoroughly inspects and services all our used equipment to minimize downtime and reduce common issues like paper jams. If you need replacement parts, consumables, or professional service for your used copier/duplicator, contact us today for a fast, reliable solution.
Need help identifying a specific jam code not listed here? Reach out to our support team with your machine’s brand, model, and jam code, and we’ll help you resolve the issue quickly.

 Hot News